Tuesday, October 16, 2012

Caldo de Res


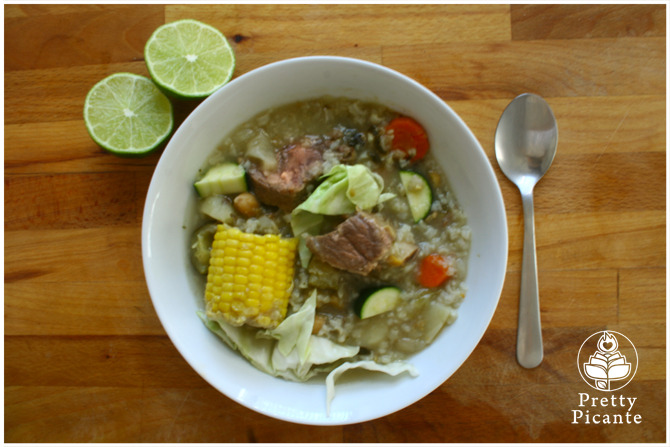
I want to dedicate this recipe to all of you, who like myself, don't have a mommy around to take care of you when you're sick. There is nothing that makes me feel better, like a bowl of my mom's hearty Caldo de Res (beef soup). We all know that when you're feeling under the weather, the go-to food is chicken soup, and I love me some chicken soup, but there is something about Caldo de Res that warms me up, fills my belly, and makes me feel like I can fight a swarm of ninjas (even if just for a minute). So, when my beautiful mom is not around, I peel myself out of bed and very pathetically crawl to the kitchen.

Caldo de Res starts with creating a flavorful beef broth, and then slowly adding vegetables and fresh herbs. While the recipe does take a few hours to make, it's not very complicated. It just requires patience and a bit of love (even if it is for yourself).


Caldo de Res
Serves 4-6


Ingredients

2 lbs beef shank, with bone
1 onion, cut into half
3 garlic cloves
1 1/2 cups of garbanzo beans (uncooked)
2 medium carrots, roughly chopped
1 small bunch of cilantro
1 small bunch of mint
2 medium potatoes, peeled and quartered
2 ears of corn, husked and cut into thirds
2 zucchinis, roughly chopped
1 medium cabbage, cored and cut into wedges
1/2 cup of rice (uncooked)
Salt and pepper


Directions

Fill a large soup pot about 1/2 way with water and boil. Once the water has boiled, add the meat, about 3 tbs of salt, 1 teaspoon of ground pepper, garlic, and garbanzos, continuously removing the foam that is brought to the top of the pot. Lower the heat to medium-low. Let cook for about 1 hour or until the meat is tender. Follow by adding carrots, potatoes, zucchini, corn, cabbage, mint, and onion. Cook for another hour and then add cilantro, and rice. At this point, you'll want to taste and adjust the seasoning, if needed, add salt and pepper. Cook for another 30-45 minutes. If at any point the broth gets too thick, add water and adjust seasoning.

Ladle into soup bowls and serve with warm corn tortillas, salsa, and a wedge of lime.

Wednesday, September 12, 2012

The Thing about Tinga


Tinga is a dish I grew up eating at a potlucks and picnics. Now that I can cook it myself, I realize why it was such a common dish to bring, it's easy to make and delicious served warm, and maybe even more delicious served cold. Imagine a chicken salad that has been bathing in a broth of spices, tomatoes, onions, with just a hint of smokiness from chipotle peppers. That's Tinga. The other great thing about it, is that it's so versatile. You can eat it in taco, on a tostada, gorditas, sopes, or quesadillas (as pictured above). Tinga can also be made from shredded pork or beef, so feel free to make substitutions.


Tinga de Pollo
Serves 3-5


Ingredients

3 cups of cooked shredded chicken
1 tbs of vegetable oil
 2 large tomatoes, roughly diced
1/2 large yellow onion, sliced
1/2 tbs ground cumin
1/2 tbs dried Mexican oregano
1/2 tsp dried thyme
2 garlic cloves, minced
1 cup chicken stock
1 canned chipotle pepper, roughly chopped
1-3 tbs of adobo sauce from the chipotles
Salt and pepper to taste

 Directions 

 Heat oil in a saucepan over medium heat. Add the onions and cook until soft, about 5 minutes. Add the garlic and cook for an additional 2 minutes, stirring occasionally. Add the diced tomatoes and cook until they begin to soften and fall apart, about 5 minutes, stir occasionally. Add half of the chicken broth and let simmer for 2 minutes. Add the remaining ingredients (except the adobo sauce), chicken, cumin, oregano, thyme, chipotle, salt and pepper , and remaining chicken stock. Stir well, making sure everything mixes together. Stir in the adobo sauce, 1 tablespoon at a time. The more you add, the spicier it is. Taste and adjust any seasonings. Bring to a boil and then lower heat and let simmer for 20 minutes.

You can serve warm or cold. Some great topping suggestions are your usual suspects, sliced avocados, queso fresco, salsa, sour cream, radishes, diced onions and cilantro.

Tuesday, July 24, 2012

Carnitas


Carnitas are traditionally slowly fried in a large copper pot filled with (delicious) lard. Since most of us don't have access to such a huge amount of lard, a large copper pot, and the courage to sit around and stir a gigantic pot full of super hot lard, this is my version of Carnitas that you can cook right on your stove top.

When you make Carnitas the traditional way, you end up with chunks of meat that are fried on the outside, yet moist and juicy on the inside. This happens because you start frying them in lard at low heat, which prevents the juices of the meat from escaping, and only until the end do you turn up the heat to crisp the outside. You simply cannot mimic this technique by just slow roasting and have the same end results. What I have done with this recipe is to slow cook the pork in a broth (or braise) that will continuously add flavor and liquid during the cooking process, but also, I save the cooking liquid and add it at the end to add even more flavor and moisture. When you braise such a large piece of pork, you will not end up with any crispness. So, after the pork has been braising for hours, and you can pull the meat off the bones, I shred it and fry it in a pan with oil until some of the pork has crisped up to a golden brown.

I will flat out tell you that these are not like the Carnitas that I grew up with, but they are dammed tasty and come close to the ones my uncles used to make when I was a kid.


Carnitas
Serves 6-8

Ingredients

1 (4lb) pork shoulder roast
1 tbs salt
1 tbs pepper
1 tbs dried oregano
1 tbs garlic powder
2 bay leaves
2 cups low-sodium chicken broth
1 orange (cut in half)


Directions


Mix together salt, pepper, oregano, and garlic powder. Coat pork with the mixture. Place the bay leaves in the bottom of a slow cooker or large pot and place the pork on top. Add the orange. Pour the chicken broth around the sides of the pork, being careful not to rinse off the spice mixture. Cover and cook on Low until the pork shreds easily with a fork, about 7 hours. Turn the meat after it has cooked for 3.5 hours.

When the pork is tender, remove from slow cooker, and shred with two forks.

 In a skillet, heat a table spoon of oil. Add the shredded pork to the oil and cook until the strips are lightly browned on the ends. Place all of the browned meat in a separate dish and use cooking liquid as needed to moisten the meat.

Tuesday, July 17, 2012

Review: Papacitos!


Rating: 
http://papacitosbrooklyn.com/
999 Manhattan Avenue
Brooklyn, NY 11222

No, I'm not starting a new phase in my life where I'm going to start harassing men on the street and calling them "Papacitos!" Although, it's always been a fantasy of mine for the roles to be reversed and see how men like being cat-called. I kid. Papacitos isn't just something you call a hot piece-of-man, it's also a Mexican restaurant in Greenpoint, Brooklyn.

I'm noticing a trend in Greenpoint of really great Mexican restaurants (Calexico being another one of them). I heard that there are crazy levels of radiation in Greenpoint and maybe it's creating radiation-induced Superchefs? Ok, obviously not, but this is only adding to the jealousy I feel towards all of you Greenpointiacs (is what I calls ya) and your awesome neighborhood. Luckily, the gringo and I have really awesome friends that live in Greenpoint and visit them on a weekly basis. Our visits usually include us eating wings at The Habitat and eating way too much to the point that we no longer know the feeling of shame. Well, this last visit, we decided to give another restaurant a try. I'd heard so many great things about Papacitos, so I was really excited to finally give them a try. Although I would rather be giving you a review about my visit to the restaurant, this time all I can give you is the scoop on their delivery, which I think can be equally as important. I ordered a carne asada taco, a green chile burrito, and the gringo ordered a chorizo taco and chicken quesadilla. The food was moderately priced , $5 for two tacos, $9 for a burrito, and $9 for the quesadilla. I honestly can't say if the delivery was fast or not, it FELT like it came quickly, but to be honest, we were having a grand ol' time, so I couldn't tell if we were just distracted. When the food came, it was still warm though. Win! The delivery guy was super nice, too! The tacos are served in the traditional street style, two corn tortillas, meat, cilantro, onions, salsa. That's the way to serve a taco! No need for distracting frills, just simple ingredients that enhance and don't distract you from the flavor of the meat. The one thing that stood out to me were the tortillas. They reminded me of the freshly made stack of warm tortillas that my mom gets delivered to her in a beautiful embroidered napkin to her house in Mexico every morning. The tortillas were moist and actually tasted like corn, not chalky and dry like the horrible ones they sell at most bodegas. I really enjoyed the carne asada and the salsa had the perfect amount of heat for me. The chorizo taco was also really great and although it wasn't the traditional loose chorizo that I'm used to, it was more of a sausage, the spices were just right. I don't have anything to rave about the burrito, but then again, I usually don't. I think burritos have way too many ingredients in them and the flavors just sort of end up getting lost. The quesadilla was prepared perfectly, a crisp flour tortilla, gooey jack cheese and really well-seasoned chicken. 

Aside from really great food, I've heard that Papasitos has a Loteria night, or as they put it (for the gringos), Mexican Bingo. I'm really looking forward to actually going there and trying more of their food and hopefully playing some Loteria; I really hope they use frijoles (beans) as markers and not some fancy Bingo chips!

Tuesday, July 10, 2012

Shrimp Ceviche


I haven't posted a new recipe in a while. I don't have a good excuse, but what I do have for you is a good recipe to make up for my slacking.

With this ridiculous heat, I thought I'd give you guys something refreshing and easy to make. Shrimp ceviche is something I've always enjoyed making as a summer dish. Traditionally, ceviche is raw seafood that is "cooked" in lime, or other citrus juice, usually marinated overnight. However, this is my easier version that doesn't require hours of marinating. Instead, I pre-cook the shrimp and then marinate them in lime juice for only one hour. I feel like you get the same flavors in half the time, plus, you minimize the risk of food poisoning (yikes!).


Shrimp Ceviche
Serves 4-6

Ingredients

1 pound medium shrimp, peeled and deveined (save the shells)
2 tbs salt
1 3/4 cups fresh lime juice
1/2 cup diced onions
1/2 cup diced tomatoes (remove pulp)
1/3 cup chopped cilantro
1/2 cup diced cucumber
1 tbs dried oregano
salt and pepper


Directions

In a large pot, add 4 quarts of water, 2 tbs of salt, the shells that you removed from the shrimp and bring to a boil. With a slotted spoon, remove the shells and discard. Now add the raw shrimp. The shrimp will take about 45 seconds to cook, so you'll have to watch them closely. As soon they turn pink and are no longer transparent, quickly remove them from the water with a slotted spoon.

Cut the shrimp in thirds. Place them in a bowl and add the lime juice. Cover and let marinade in the fridge for an hour.

Add the remaining ingredients and then place back in the fridge for another 30 minutes. After this, I like to taste the ceviche and adjust seasonings. Once everything is nice and tangy and perfectly seasoned, I plate the ceviche by using a slotted spoon to drain a bit of the lime juice. You don't want to drain it all, but you also don't want to serve it with all that juice.

I like serving ceviche with tostadas, sliced avocados, and some hot sauce (my favorite is Valentina). If you can't find tostadas, tortilla chips will also do the job. 

Friday, May 4, 2012

Cinco de Mayo: A great excuse for a fiesta!


Yeah… yeah, Cinco de Mayo isn’t really a huge Mexican holiday, unless you live in Puebla. That isn’t to say that we can’t have fun and enjoy a day designated to celebrate our wonderful culture. So, let’s all drink margaritas, eat tacos, dance some zapateados and not remember any of it the next day.

Here are a few tips and some easy recipes for your fiestas!

 Tips 

  • Sautee diced onions, diced tomatoes, and diced jalapeños. Then, add your favorite meat (eggs or potatoes for vegetarian yumminess) for a quick “a la Mexicana” dish. 
  • If you’re going to use canned refried beans, make them even better by sautéing some fresh diced jalapeños in a tablespoon of oil and then add the beans. Sautee for a few minutes, until the peppers are evenly distributed.

 Recipes 


Micheladas 
Add some spice to your plain ol’ beer by adding a few ingredients.

Ingredients

Ice cold beer
1/2 tbs ground piquin pepper (substitute cayenne, but use less)
1 tbs Kosher salt (to coat rim of glass)
1 lime slice
Juice of 1.5 limes
2 dashes of “Maggi” seasoning sauce (substitute soy sauce)
2 dashes of Worschestire sauce
2 tsps hot sauce (I prefer Valentina brand)
Salt and pepper


Directions

Coat the rim of a glass with the slice of lime. Make a salt and piquin pepper mixture and place on a plate. Dip the rim of the glass into the mixture.

Add all of the ingredients except the beer to the glass. Slowly pour in the beer. Stir.

Salud!


Nacho Sauce
Don’t use that weird cheese sauce for nachos, make your own. It’s worth it!

Ingredients

2 tbs unsalted butter
3 cups of milk
½ medium onion
4 garlic cloves (smashed)
1 bay leaf
1 tsp dried oregano
1 tsp ground cumin
2 tbs all-purpose flour
3 cups grated cheddar cheese
1 diced chipotle pepper in adobo sauce
1 tsp cayenne pepper
Salt and pepper


Directions

Put the milk into a saucepan and add the onion, garlic, bay leaf, oregano, and cumin. Warm over medium low heat until the milk starts to steam, about 10 minutes. Remove from the heat and let the flavors infuse while you make a roux. In a large pot, over medium heat, add 2 tbs of butter and the flour. Cook, stirring constantly, for about 2-3 minutes; don’t let the roux color. Strain the infused mil into the roux, whisking constantly to avoid lumps. Cook, stirring often, for about 5 minutes until the sauce is thick (coats the back of a spoon). Remove from the heat and add the cheese, chipotle, and cayenne; stir until it is melted and smooth. Taste and adjust seasoning with salt and pepper.

Alternately, you can add ¼ cup diced pickled jalapeños or cooked chorizo after you add the cheese.


And for that sweet tooth...


Churros


Ingredients

1 cup all-purpose flour
3 eggs
1 tbs ground cinnamon
3/4 stick of margarine
1 cup water
1 tsp sal
1 cup granulated sugar
Canola or vegetable oil (for frying)


Directions

Boil water in a saucepan. Add the butter and salt and cook until butter melts. Add the flour and remove from heat. Mix the ingredients with a fork or whisk until combined. Add the eggs, one at a time and continue mixing.

Add the batter to a large pastry bag with a large star tip. In a medium skillet, heat about an inch-deep of oil over medium-high heat (350 degrees F). Squeeze out 4" long strips of the dough into the oil. Fry until golden brown, about 2 minutes each side. Remove from oil and drain on a paper towel lined plate.

Mix the sugar and cinnamon in a plate. While the churros are still hot, roll them in the mixture.

Eat them as is or add some ice cream for a la mode!

Monday, April 30, 2012

My Alter Egos

Last weekend I took a break from my kitchen and went to Boston Comic Con. It was my very first time in Boston and I loved it! It was really beautiful and comic con was loads of fun. I'm not sure if you all know this, but when I'm not cooking, I like to run around pretending I'm a comic book character. For Boston, I brought out my favorite costume, 1960s TV Series Batgirl and threw together Danger Girl's Sydney Savage.

Here are a few pictures of my costumes.


 I even got a shoutout from the creator of Danger Girl, J. Scott Campbell!
 

 I'm back in the kitchen now, working on a Cinco de Mayo post for all of your fiestas!

Saturday, April 7, 2012

Holy Guacamole


Need a quick dish to take to an Easter brunch tomorrow? Here's my recipe for a hearty Guacamole that will add a great touch to any brunch dish or stand alone as a dip.


Guacamole 

Ingredients 

3 ripe Hass avocados
1/2 cup diced onions (white, vidalia, or red)
1/2 cup diced tomatoes (seeds and pulp removed)
1 jalapeño, diced (remove seeds for less heat)
1/4 cup cilantro, chopped
1/2 lime,juiced
1/2 tsp cumin
1/2 tsp dried oregano
Salt Pepper


Directions 

Cut the avocados in half, remove seed, and scoop into a bowl. Mash with a fork, add the remaining ingredients, and mix everything. When seasoning with salt and pepper, do it gradually, you'll want to taste and then adjust if needed.


I added this handy guide on how to buy avocados from avocadocentral.com

Here's how to pick the best Hass Avocados:
Step 1 – Take a look at the chart below. When comparing a group of Hass Avocados, check the outside color of the skin of the avocados for any that are darker in color than the others. These may be riper than Hass Avocados with lighter skin. Check the outer skin of the avocado for any large indentations as this may be a sign that the fruit has been bruised.

Step 2 – Place the avocado in the palm of your hand.

Step 3 – Gently squeeze without applying your fingertips as this can cause bruising.

Step 4 – Picking ripe ready-to-eat Hass Avocados. If the avocado yields to firm gentle pressure you know it's ripe and ready-to-eat. If the avocado does not yield to gentle pressure it is considered still "firm" and will be ripe in a couple of days. If the avocado feels mushy or very soft to the touch it may be very ripe to overripe
 

Wednesday, April 4, 2012

Tacos Dorados de Papa


When my cousin, Betty, got married, she was very young. As a new and young bride, she worried that she would not be able to live up to her new husband’s expectations. See, when you marry a Mexican man, more often than not, he has been spoiled all of his life by his mother’s cooking. When you marry a man who has grown up with enchiladas, mole, and tamales, as meals that his mother just “threw together,” you have very big shoes to fill. The pressure was on for my cousin. To prevent  him from missing his mom’s cooking back home, she needed to come up with dinner ideas that were easy enough for her to make and would satisfy both their appetites. The very first meal that she made for her husband was “Tacos Dorados de Papa” (in English please: Deep-fried Potato Tacos). It was the perfect meal, it called for a few ingredients and were delicious and easy. She served the tacos with salsa, sour cream, and shredded cabbage. He loved them! She was so delighted with the success of the very first meal she prepared for her husband that the very next day she made him some more tacos! Her husband, not wanting to hurt his new bride‘s feelings, didn’t know how to bring up that he was starting to grow tired of eating tacos every day for the last few weeks, not to mention that he was worried that this diet might lead to weight gain. Eventually, he had to break it to her that, although she had now become an expert taco maker, he could not possibly eat any more tacos.

Tacos Dorados de Papa are a very popular street food in the town that I grew up in, La Blanca, Zacatecas. A lady, or sometimes man, would set up outside their house with a “cazo” (cauldron) of hot oil, you’d tell her how many “orders” you’d like and in a few minutes she’d hand you a plate of fresh and crispy corn tortillas filled with a savory mashed potato filling.

These are quite easy to make, hence why my cousin made them her first dish as a blushing new bride. You can even prepare the ingredients ahead of time to save you some time. You’ll also want to make sure that the oil is hot enough, but not too hot, to prevent them from absorbing too much oil and getting soggy. If you’re not using the best quality tortillas, it’s really hard to keep them from falling apart, or the filling from coming out, so I use two toothpicks to pin the sides together. Just make sure you remove the toothpicks before serving. Although, my cousin is still married to her husband, I suggest that you not try to serve these to your loved ones every day.


Tacos Dorados de Papa


Ingredients

15-20 tortillas
Oil for frying
6 potatoes (russet or golden)
Salt
1/2 tsp pepper
1 tsp cumin
1 tsp garlic powder
1/2 cup of cheese (cotija, crumbled queso fresco, cheddar, monterey jack)
Toothpicks

Toppings

Salsa
Shredded cabbage
Avocado
Sliced Tomatoes
Grated cotija
Sour cream or Crema Mexicana


Directions

Boil the potatoes in water, add a tbsp of salt, cover and cook for about 30 minutes or until soft enough to put a fork through them. Drain water and set aside to cool. Remove the skins and mash potatoes until broken up. Add the pepper, cumin, garlic powder, salt (about a teaspoon, adjust to taste), and cheese. Mix well until the mixture is smooth.

Heat about a cup of oil in a frying pan over medium-high heat.

Warm the tortillas on a griddle just enough to soften them. You don't want them to be on the griddle too long that they start to harden. Once all the the tortillas are warmed, add a heaping tablespoon of potato mixture to the middle and spread slightly so that you don't have just one big lump in the middle. Fold the tortilla in half and "thread" a toothpick on one half to create a closed seam, then do the same to the other half (pictured above).

Once you are done putting together the tacos, gently place in the heated oil. Fry on each side for about 2 minutes or until golden and crispy (it's ok if a bit of the filling comes out). Remove and drain on a paper towel-lined plate.

Remove the toothpicks. Open them up slightly, and stuff with your favorite toppings. Crunch away!


Thursday, February 9, 2012

Chicken Tortilla Soup


I'm tempted to go on a quest/rant and figure out why chicken tortilla soup is not called its rightful name, Aztec Soup. Perhaps the name suggests that it is a soup made from Aztecs? Well, whatever the reason is, there is one thing that is clear, this soup is delicious and one of my go to meals when I'm sickies (the spiciness will clear your sinuses!) or need some comfort food.

This is a recipe that I did not learn from my mom. I've developed this recipe from trial and error and taking ideas from other people's versions. The one that most inspired me was served at my brother's wedding, which took place in my hometown in Mexico. It was one of the million courses that resulted in me having eaten the equivalent of three days' worth of meals, and although it is Aztec soup, I was lucky that Montezuma did not take revenge on me.


Chicken Tortilla Soup
Serves 6


Ingredients

4 cups of shredded chicken (I use both breast and thigh meat)
4 medium tomatoes, roasted (instructions for roasting to follow)
2 dried pasilla, guajillo, or ancho peppers, stemmed, seeded
1 cup yellow onions, chopped
2 garlic cloves, chopped
1 bay leaf
½ tbs ground cumin
1 pinch of dried oregano
8 cups of chicken stock
1-2 tbs of salt
1 tsp pepper
3 tbs of olive oil
1 cup of vegetable oil for frying
10 tortillas, cut into strips


Directions

In a large soup pot, heat 2 tbs of olive oil over high heat. Tear the pepper into pieces and add to pot, cook for about 1 minute. Remove the pepper pieces from pot and set aside. Remove pot from heat and let cool for about a minute. Return to heat and lower to medium, add the onions and garlic, cook for 2 minutes, stirring occasionally. Add oregano and bay leaf and cook for an additional 3 minutes. Remove the bay leaf and discard. Remove the onion-garlic mixture and put in a blender (try to get as little oil as possible. Do NOT clean pot). Lower heat.

In a blender, add the cooked onions and garlic, roasted tomatoes, and puree.

Turn on the heat to high, add 1 tbs of oil, add the blended mixture and fry for about 5 minutes. Add the chicken broth and cumin, let simmer for about 25 minutes. Add the chicken and simmer for an additional 5 minutes. Add salt and pepper to taste. Remove from heat, cover and let sit.

Heat vegetable oil in a skillet over medium-high heat. Once oil has reached frying temperature (350 degrees F or test it out with a piece of tortilla, it should start to fry immediately), add the tortilla strips in batches. Fry for about 1-2 minutes or until golden and crispy. Remove each batch and let drain over a paper towel-lined plate.

Serve in bowls. Garnish with fried tortilla strips, a lime wedge, and your choice of toppings!

Topping suggestions: Cheese (queso fresco, Monterey jack, cotija), cilantro, sliced avocado, finely shredded cabbage, corn, beans, and sour cream.

Tuesday, January 31, 2012

Review: Mary Ann's


Rating:
http://www.maryannsmexican.com/
116 8th Avenue
New York, NY 10011

One of the many perks of living in NYC is that more often than not, if you're walking around and try a new restaurant, you will leave with a full belly, a happy palate, and a new place to take friends when they visit. Most of my family and friends come from either California or Mexico, so when I have to think of restaurants to take them, I know that they probably won't want Mexican. This works out well for me because, as I've mentioned before, this city is not the go-to for Mexican, but that doesn't mean I won't stop trying to find the few hidden gems. In my quest to find more good Mexican restaurants, I wandered into a place called Mary Ann's on 8th Ave. (between 15th and 16th street). Unlike a good role playing game, I was not instructed to go there by the recommendations of a friendly quest giver. Instead, my decision was solely based on seeing a floor packed with tables of hungry villagers, which was a big mistake that cost us about sixty dollars.

When seated, guests are served with salsa and tortilla chips. The chips are freshly made and perfectly crispy, but that's not enough to distract you from their flavorless and underwhelming companion, the salsa. Not only was it watery and not spicy, but I'm pretty convinced that there was not even a pinch of salt in there, let alone spices. While putting to use my secondary talent, eavesdropping, I heard from the table next to us, "Wow! They must have changed owners. I've been coming here for years. This salsa has no flavor." That comment confirmed what I also tasted, but it also gave me hope that maybe it was just a bad batch and the main courses would be better.

The gringo boyfriend seems to always be in my party when I go on these quests for delicious Mexcan food. I guess in the world of RPGs (role playing games) I would be the tank and he is my off-tank. I'm the first to taste the food and assess the situation before handing it off to him for support and to analyze our strategy. In the case of the battle at Mary Ann's, we ordered Pork Enchiladas in Red Sauce, with a side of rice and beans. This was not a battle we were unfamiliar with, since this is typically the dish we order. In typical NYC Mexican food style, the rice was dry and bland. It had the tell-tale sign that it came from a box; the rice grains didn't blossom. The beans were not bad; they were seasoned well and creamy. Unfortunately, that was the highlight of the dish. When we wielded our knives and forks and took a swing at the enchilada, we were very disappointed. The pork, although very tender, was under-seasoned. The red sauce was almost impossible to taste because it was overwhelmed by the heavy cloak of cheese that was slathered on top.

We are not the kind to step away from a challenge, so I do have to admit that we ate all of the food and left our plates clean. That's not because we enjoyed it, but because we are both gluttons that have no self-control when it comes to food. We might as well yell out "Leeeeeroy Jenkins!" before we begin any meal. Although we left Mary Ann's with a full belly, over all it was a disappointing meal that left us with no desire to go in for more attempts.

Wednesday, January 11, 2012

Sopes


For today's post, I bring you the awkward stylings of Maria Palafox! I'm tempted to speak in third person only because I don't want to admit that it's me who you are about to witness attempting to make a "How to" video.

For this recipe, I thought it more important to actually show you the technique instead of rambling on in a wall of text. Since I am no stranger to making a fool of myself, I decided to post these videos of me rambling and awkwardly flaring my nostrils in order to teach you how to make a Sope. I also feel the need to throw out as many disclaimers as I can, like how the audio and video are pretty bad because it's amateur night at Pretty Picante and all I have for recording equipment is my iPhone (for now).

Sopes are a traditional Mexican dish that is served as either an appetizer or a main course. You begin with the base, which is made out of masa (cornmeal dough), and formed into a sort of thick tortilla, deep fried, and filled with different toppings. There is a technique for making the base, which can be easily learned after a few attempts and hopefully not too many burned fingers. I'm providing you with two how-to videos that will hopefully simplify the process.

In the videos, I use a tortilla making "machine," which can be usually found in Mexican grocery stores. If you can't find one, you can just as easily use two cutting boards or even two books! I also use a large ziploc bag that I cut to the size of the machine to line the inside in order to prevent the dough from sticking.Many of us don't have access to a corn mill, so it might be difficult to get a hold of good quality masa. Instead, you can purchase some from a Mexican grocery store that has already been prepared or use a product like "Maseca," which is pretty tasty.


Sopes


Ingredients

Maseca or "Masa for Tortillas"
2 cups oil
Refried beans
3 cups of filling (i.e. chicken, carne asada, potatoes)
2 cups of finely shredded cabbage
1 cup diced white onions
1 cup chopped cilantro
1 cup cotija cheese (or parmesan)
Sour cream
Salsa


Directions

Prepare the masa following instructions on label. Make sure to cover the masa with a damp cloth to prevent drying. Once the masa is ready, make equally sized balls of dough by rolling between the palms of your hands. Flatten to make a disc. Use your tortilla machine to gently flatten. Remove and place on a warm griddle (or pan). Let cook for 1 minute on each side. Continue turning until both sides have turned a slightly darker color and have developed a slightly hard exterior. Please see video below for details.


Once the sopes are cooked through, you will need to form them and here's the video to show you just that!


Heat oil in a skillet over medium-high heat. Gently place each formed sope into the oil and fry until they are golden light brown and slightly crispy, about 1 minute on each side. Remove and drain on paper towels.

The final step is to top them with lots of goodies. You begin by laying down a base of refried beans. Add a heaping tablespoon of your favorite filling, top with cabbage, onion and cilantro, salsa, sprinkle a tablespoon of cotija cheese, a dollop of sour cream, and salsa!

Wait, the final step is to put on a bib and get ready for some deliciously messy eating!

Wednesday, January 4, 2012

Chiles Rellenos


Is one of your New Year's resolutions to lose weight? Then, I suggest you move along... move along... because these aren't the recipes you're looking for. Before you go about your business, if you do allow yourself a cheat day, indulge in this recipe for Chiles Rellenos!

Chiles Rellenos are quite the treat! It's a roasted poblano pepper stuffed with your choice ingredient (usually cheese or ground beef), then egg battered, deep fried, and bathed in a savory tomato sauce. For this recipe, I like to use queso fresco. The smooth and salty flavor of the cheese really compliments the smokey flavor of the poblano. If you don't have queso fresco, feel free to use a mixture of half mozzarella and half monterey jack cheese.I hope you have a good electric mixer or a really big muscley arm to beat some egg whites and get to stuffing!

Note: See that little tomato icon down there? That's my super fancy way of noting that this is a vegetarian friendly dish!

Chiles Rellenos
Serves 4


Ingredients

4 poblano peppers
2 cups of queso fresco, crumbled
1 cup all-purpose flour (reserve half for dredging)
1 tsp salt
1/2 tsp onion powder
1/2 tsp garlic powder
5 egg whites, room temperature
1 egg yolk, lightly beaten
1-2 cups of vegetable oil
Tomato sauce (recipe to follow)
Crema Mexicana (Mexican cream), creme fraiche, or sour cream
10 toothpicks


Directions

Place the peppers on a skillet over medium-low heat. As each side gets roasted (turns black), turn each pepper, making sure that all sides have been roasted. Once the peppers have been roasted, and cooked through, place in a plastic bag and close tightly. Leave them in the bag for about 15 minutes. After the 15 minutes are up, remove the peppers and begin peeling the charred skin off. Once all the skin has been removed, cut a slit down the side of each pepper (lengthwise), remove seeds, and veins.

Take a handful of your filling (i.e. cheese or beef) and compact it in your hand, forming a sort of "ball" and insert into each pepper through the slit that you made earlier. Be gentle when handling the peppers, you don't want them to tear. Close the slit and pin together with toothpicks. Try to use the same number of toothpicks for each pepper. You'll need to remove them later and this makes it easier to know how many need to be removed from each pepper. Dredge each pepper in flour, dusting off excess, and set on a plate. Once you have dredged all the peppers, cover, and let them set in the freezer for about 25 minutes.

Mix 1/3 cup of flour, salt, garlic and onion powder in a bowl and set aside. In a separate, chilled, bowl, beat the egg whites until the whites form a stiff peak. Gently fold in the egg yolk and flour-salt mixture. Once everything has been incorporated well, remove the peppers from the freezer and dredge them in flour again, dusting off excess. Hold the pepper by the stem and dip into the egg batter, making sure it is fully coated (be gentle).

Heat oil in a skillet over medium-high heat. Once the oil has reached frying temperature, gently place the battered peppers into the oil and fry on both sides until golden brown. Use a large cooking spoon to gently pour oil over the side that is facing up, this helps when you have to flip them. Remove peppers to a paper towel-lined plate. Now for the tricky part. Gently feel around and find those pesky toothpicks. REMOVE THE TOOTHPICKS!

Serve on a plate and pour a generous amount of tomato sauce over it and a tablespoon of cream.

Now get to om nom noming!


Tomato Sauce


Ingredients

3 medium size tomatoes, stewed
1/4 onion
1 garlic clove
1 tbs chicken bullion
1/2 tsp cumin
Pinch of ground clove
1 tsp Oregano
1 tbs oil


Directions

In a blender, add tomato, onion, and garlic. Blend until smooth.

Heat the oil over medium-high heat on a skillet. Fry the mix, when it starts boiling add 1/4 cup of water, bullion, clove, and oregano. Lower heat and allow to cook for 5 more minutes. Adjust seasoning as needed.


Serving Suggestions:
Over a bed of rice
Remove the stem and cut into four parts. Make yourself a vegetarian burrito!
Heat up some tortillas and make tacos.

Produce Selection Tip:
When choosing poblano peppers, look for a deep green color, free of bruising, with a firm skin. For this recipe, pick peppers with a long stem, it will help with the battering process.